
Service Requests
Service Requests are the central tool for tracking work, queries and tasks across your OMCs. A request can relate to a specific unit and contact, or be a general OMC-level task. Each request has a status (Open, Resolved, Accepted) and an action status (Planned, Unplanned, Overdue, Complete, etc.) so you can track both the overall outcome and the day-to-day progress.
Every request is either a case, an incoming request to the OMC, or a work order, an outgoing request from the OMC to a supplier — see Cases and work orders.
Requests can be raised by managers directly, submitted through a community channel by a contact, or created automatically from a recurring job template. They can be assigned to an agent, linked to a parent request, and billed to the OMC or the unit owner.
The list views let you filter by agent, OMC, status and priority to focus on what needs action today. The conversation tab records all internal notes and communications related to the request.
List View
Section titled “List View”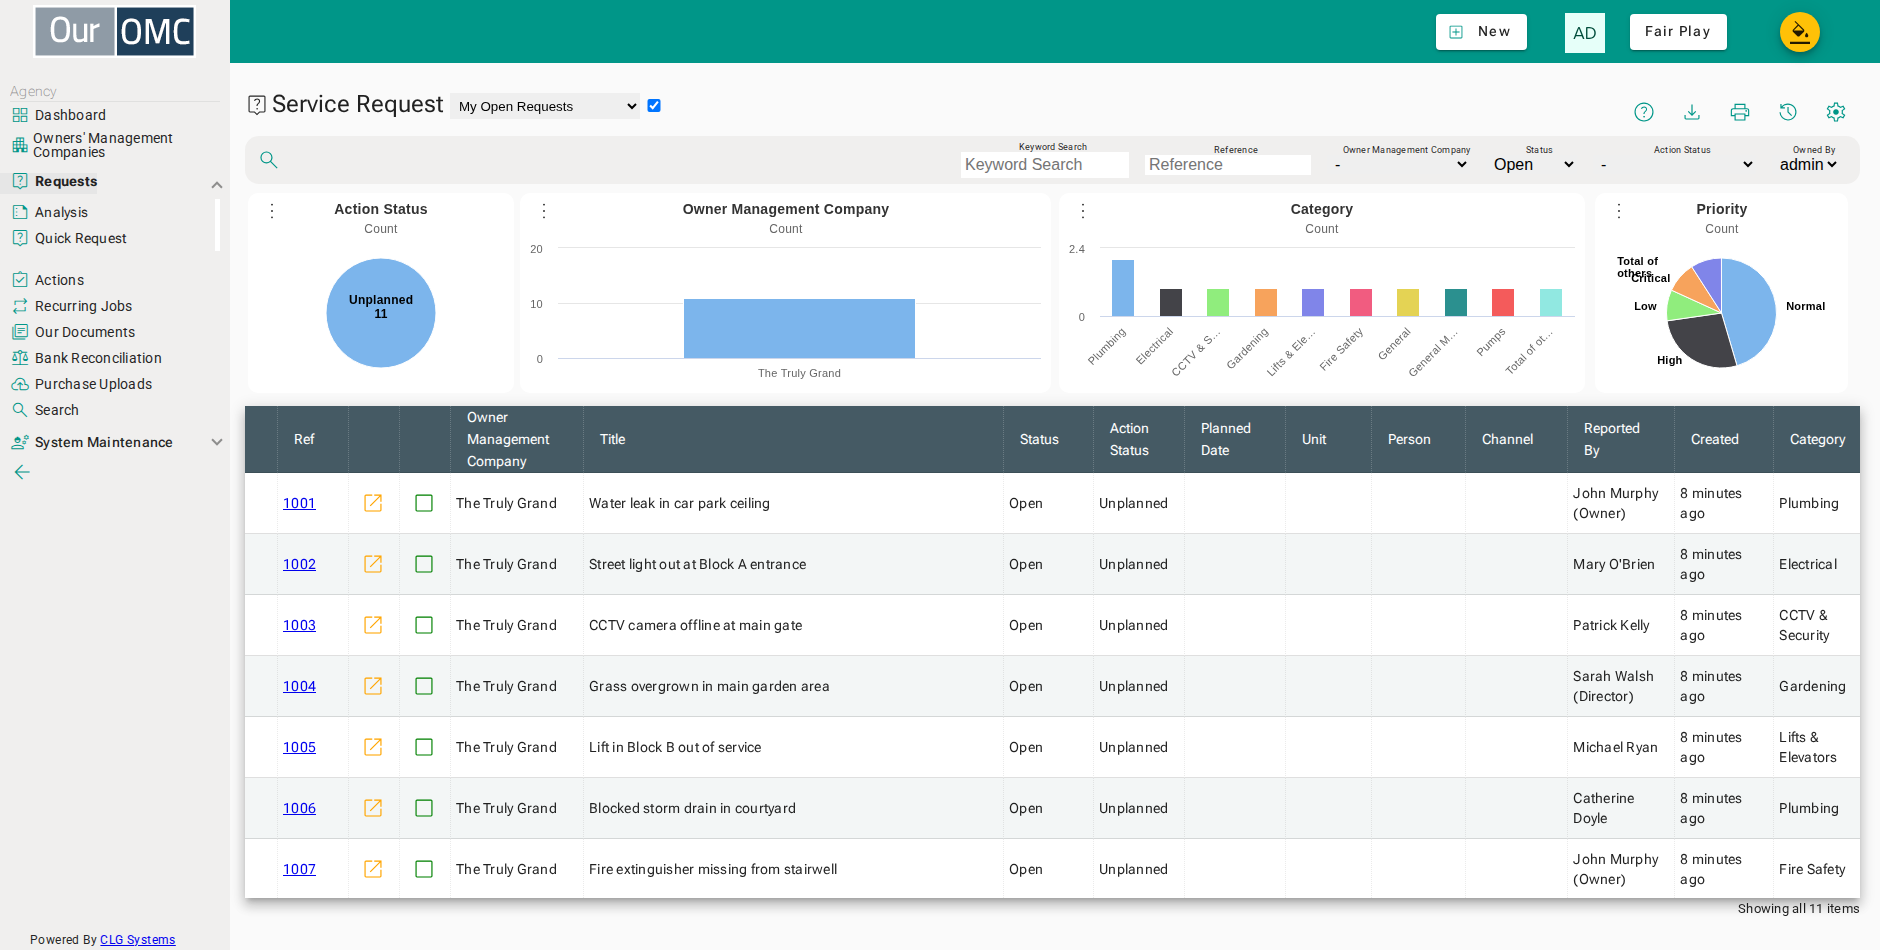
| Column | Type | Description |
|---|---|---|
| OMC | picklist | The OMC this request belongs to. Shown in the list so you can tell apart requests from all the OMCs you manage. |
| Ref | link | The unique reference number for this service request — click to open the full detail view. |
| Type | pill | Whether this is a Case or a Work Order. It is set automatically: a request with a supplier is a Work Order, and one without is a Case. |
| Channel | pill | The channel (community forum) through which this request was submitted, if applicable. |
| Priority | pill | The priority level of this request, determining urgency and response time targets. |
| Status | pill | The overall status of this request — Open (in progress), Resolved (completed), or Accepted (signed off). |
| Action Status | pill | The detailed action status — for example Overdue, Planned, Waiting, Complete, or Cancelled. |
| Created | dateTime | The date and time this request was first created. |
| Title - A shortname for this request | text | A short descriptive name for this request — used to identify it in lists and notifications. |
| Supplier | pickLink | |
| Unit | pickLink | The unit this request relates to, if applicable. |
| Contact | pickLink | The contact (owner or resident) who raised or is the subject of this request. |
| Reported By | picklist | The contact who originally reported this issue, if different from the unit owner. |
| Topic | picklist | The broad subject area this request belongs to — Building, Equipment, Services, Access & Security, Service Charges & Payments, Administration, or Something Else. Choosing the topic narrows the class list to the classes that belong to it. |
| Class | picklist | The specific classification within the chosen topic, such as Drains, Lifts or Service Charge Query. This is what drives the request analysis, so it is worth setting accurately at triage even on a request that closes the same day. |
| Owned By | pickLink | The team member responsible for driving this request to resolution. |
| Approved | dateTime | The date and time this request was approved. *** Has been deprecated - no longer available *** |
| Completed | dateTime | The date and time this request was marked as completed. |
| Source | picklist | How the request reached the agent — a phone call, an email, a visit to the office, a meeting, a site visit, or the out of hours service. For inbound email etc, the system sets it automatically. If manually creating a request, set it accurately: it is what shows how much work arrives through each channel. |
Detail View
Section titled “Detail View”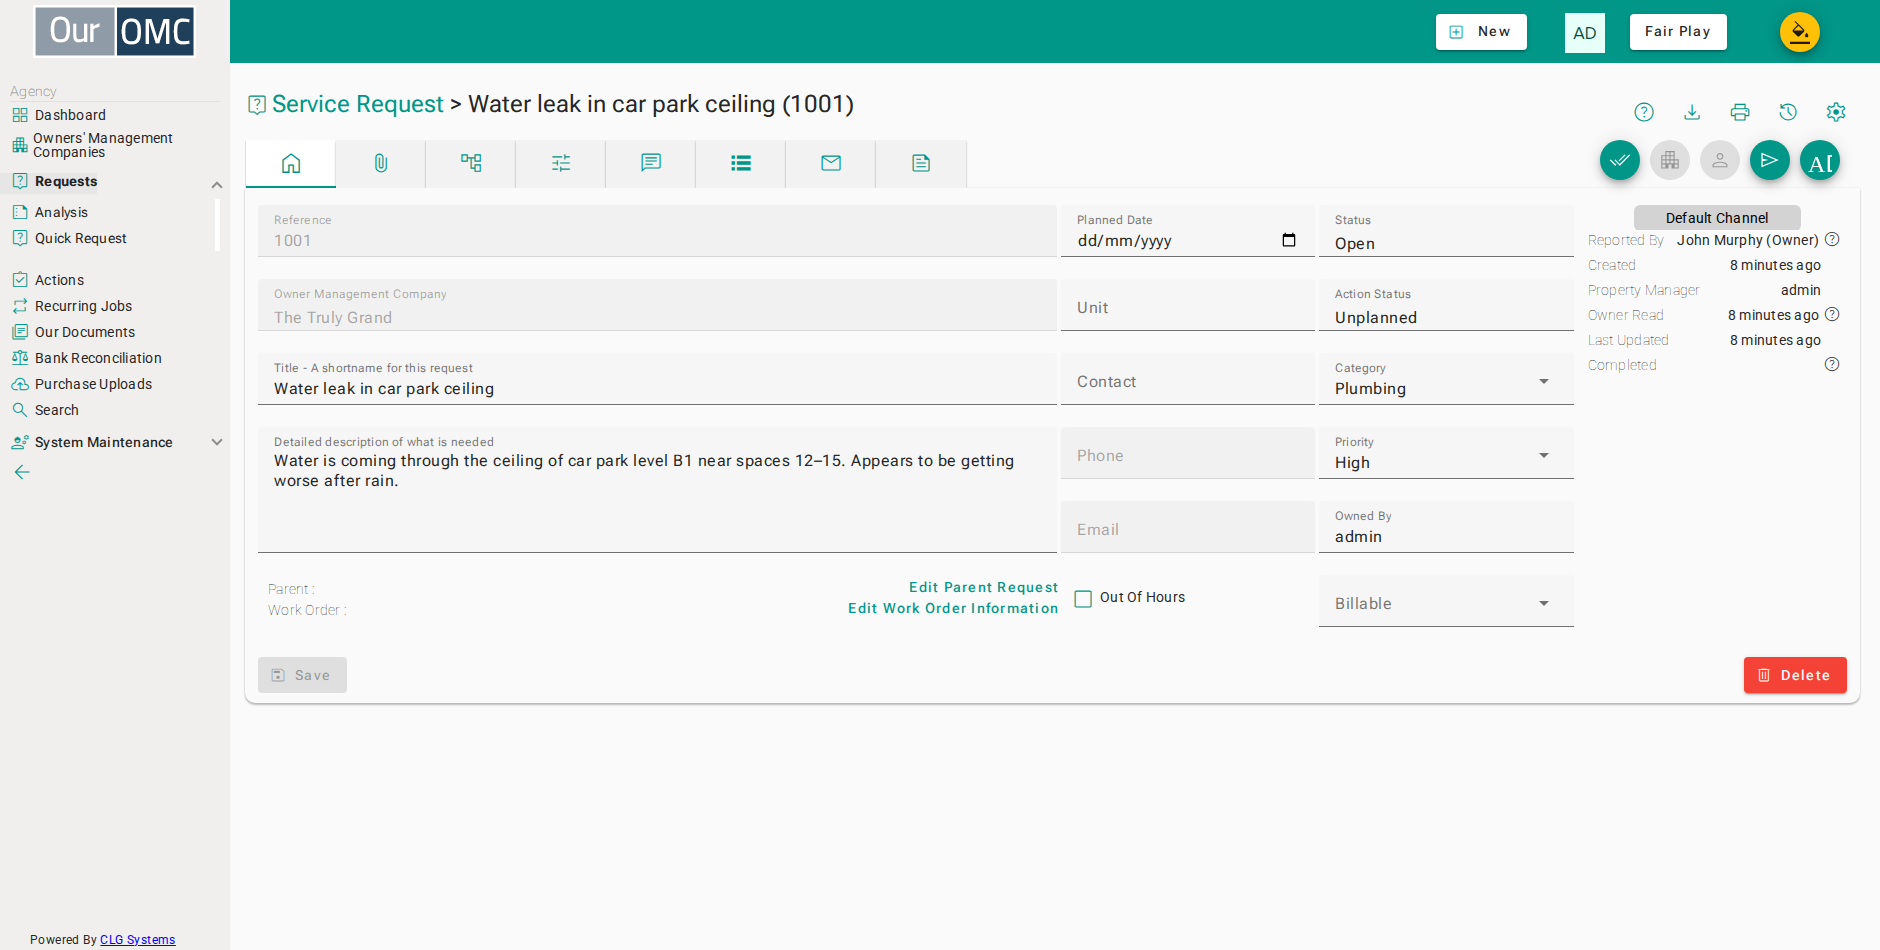
| Field | Type | Description |
|---|---|---|
| Reference | number | The unique reference number assigned to this service request. |
| Type | pill | Whether this is a Case or a Work Order. It is set automatically: a request with a supplier is a Work Order, and one without is a Case. |
| Channel | pill | The channel (community forum) through which this request was submitted, if applicable. |
| Priority | pill | The priority level of this request, determining urgency and response time targets. |
| Status | pill | The overall status of this request — Open (in progress), Resolved (completed), or Accepted (signed off). |
| Action Status | pill | The detailed action status — for example Overdue, Planned, Waiting, Complete, or Cancelled. |
| Assistant | pill | What the assistant did with this request, such as To Review, Auto Sent, Accepted, Changed or Rejected. Click to open the AI log for this request. |
| Created | dateTime | The date and time this request was first created. |
| Title - A shortname for this request | text | A short descriptive name for this request — used to identify it in lists and notifications. |
| Detailed description of what is needed | longText | The full description of what is needed, including any relevant background information. |
| Parent | pickLink | |
| Supplier | pickLink | |
| Unit | pickLink | The unit this request relates to, if applicable. |
| Contact | pickLink | The contact (owner or resident) who raised or is the subject of this request. |
| Area | picklist | The area of the development where the issue is, if it is not tied to one unit. Change it from the contacts tile. |
| Core | picklist | The core (block or stairwell) of the development where the issue is. Change it from the contacts tile. |
| Reported By | picklist | The contact who originally reported this issue, if different from the unit owner. |
| Property Manager | picklist | *** Has been deprecated - no longer available *** |
| Topic | picklist | The broad subject area this request belongs to — Building, Equipment, Services, Access & Security, Service Charges & Payments, Administration, or Something Else. Choosing the topic narrows the class list to the classes that belong to it. |
| Class | picklist | The specific classification within the chosen topic, such as Drains, Lifts or Service Charge Query. This is what drives the request analysis, so it is worth setting accurately at triage even on a request that closes the same day. |
| Owned By | pickLink | The team member responsible for driving this request to resolution. |
| Billable | picklist | Whether costs arising from this request will be billed to the OMC, billed to the owner, or included in the standard SLA. |
| Owner Read | dateTime | The date and time the contact last viewed this request in the owner portal. |
| Last Updated | dateTime | The date and time this request was last updated. |
| Approved | dateTime | The date and time this request was approved. *** Has been deprecated - no longer available *** |
| Approved By | text | The name of the person who approved this request. *** Has been deprecated - no longer available *** |
| Completed | dateTime | The date and time this request was marked as completed. |
| Resolved By | text | The user who resolved this request, who may not be its owner. Request analysis credits closed requests to this user. |
| Source | picklist | How the request reached the agent — a phone call, an email, a visit to the office, a meeting, a site visit, or the out of hours service. For inbound email etc, the system sets it automatically. If manually creating a request, set it accurately: it is what shows how much work arrives through each channel. |
| Attached Files | grid | Files and images attached to this request, such as photos of the issue or contractor quotes. |
| fileTypeIcon | icon | |
| File name | link | |
| Notes | longText | |
| editButton | icon | |
| Created | dateTime | |
| Size | text | |
| deleteButton | icon | |
| Child Requests | grid | Sub-requests linked to this request — tasks or follow-on items created as part of resolving this request. |
| Ref | link | |
| Title | text | |
| Description | longText | |
| Channel | pill | |
| Status | pill | |
| Action Status | pill | |
| Owned By | pickLink | |
| Created | dateTime | |
| Last Updated | dateTime |
Available Actions
Section titled “Available Actions”| Action | Description |
|---|---|
Close | Click to mark request as completed |
Reopen | |
Accept | |
Unit | Click to view or edit details of the unit |
New Person | Click to add a new person to this unit and grant them access to OMC |
Mail | Send an email |
| Message to Followers | |
| Mail Supplier | |
| admin | Send email to admin |
Add | Add to this request |
| Report Image | Click to add image to this request or child request |
| Add Action | |
| Add Note | Click to add note visible to agency staff |
| Add OMC Follower | |
| Add Agent Follower |
Available Tab Content
Section titled “Available Tab Content”| Main | Shows the main form fields as described above | |
| Data | Custom data fields captured for this request, typically populated from the standard request. | |
| Mailings | Emails and notifications sent in connection with this request. | |
| Notes | *** Has been deprecated - no longer available *** |
Data
Custom data fields captured for this request, typically populated from the standard request.
| Field | Type | Description |
|---|---|---|
| Name | text | The name of this custom data field. |
| Value | text | The value entered for this custom data field. |
Mailings
Emails and notifications sent in connection with this request.
| Field | Type | Description |
|---|---|---|
| From | text | The email address the message was sent from. |
| To | text | The email address the message was sent to. |
| Class | text | The type or classification of this mail item. |
| Subject | link | The subject line of the email — click to view the full message. |
| Sent | dateTime | The date and time this email was sent. |
| Size | text | The size of the email message. |
| Status | number | The delivery response code returned by the mail server. |
| Attached | link | The number of files attached to this email. |
| Status Text | picklist | The delivery status of this email — Sent, Bounced, Not Sent, etc. |
Notes
*** Has been deprecated - no longer available ***
Working with a request
Section titled “Working with a request”Each part of a request’s life has its own page:
- Raising Requests — where requests come from, and raising a case or work order yourself.
- Reviewing AI Answers — the AI assistant’s suggested answer on a new case, when AI is switched on.
- Editing a Request — the Summary, Details, People and Work Order panels.
- Inbound Mail — how emails become requests and request updates.
- Attachments — photos, quotes and reports kept with the request.
- Actions & Reminders — planning the next step and logging work done.
Closing a request
Section titled “Closing a request”Once the work is done the request is closed, and how that goes depends on which kind it is: closing a case tells everyone following it, while closing a work order stays silent and asks instead whether the invoice has arrived. See Closing Requests for both.
A closed work order also carries its money on the Work Order panel — the budget lines are the estimate, and any invoice or accrual raised against it is the actual.
Child requests
Section titled “Child requests”A large piece of work can be broken into child requests — separate requests linked back to a parent so each part can be tracked, assigned and billed on its own while the parent gives the overall picture. A child request inherits its parent’s OMC, along with its wording, priority, unit and contact, so there is no OMC to choose and usually little to change.
The two buttons under Child Requests are the two kinds of request: one raises a case for more office work on the same matter, the other raises a work order to send the work out to a supplier. Raising a work order against the case that prompted it is the usual way the two are linked, and the parent’s attachments can travel with it.
- Open the parent request
- Click the add button under Child Requests to raise a case against this request
- Give the child request its own title
- Describe the piece of work this child covers
- Record how it came in
- Click Next - the unit and contact come from the parent
- Click Next to see the follow ups the child opens with
- Set the date you expect to be able to close the child request
- Click Next past the parent files, which can be shared with the child
- Click Create Case - the child request is created and linked to the parent
- Open the parent request
- Click the work order button under Child Requests to order the work from a supplier
- Give the work order its own title
- Describe what the supplier is being asked to do
- Record how the request came in
- Click Next - the unit and contact come from the parent
- Click Next to choose the supplier
- Open the supplier picker
- Choose BBB Maintenance Services Ltd to carry out the work
- Choose to create the work order without emailing it yet
- Click Next to plan the follow ups
- Set the date you expect the work to be finished and the order closed off
- Click Next past the parent files, which can be shared with the order
- Click Create Work Order - it is created and linked to the parent
Followers
Section titled “Followers”Followers are the people kept in the loop on a request — OMC directors, other managers, agency staff, or the request’s contact when they were chosen with Follow. Anyone can be added as a follower or removed again at any time; followers see the request in their own list and receive the messages sent from it.
- Open a request
- Click the x on a follower chip to stop them following the request
- Confirm removing the follower
- Open the [Add] action menu
- Open the Add menu and choose Add OMC Follower
- Choose the contact to follow the request
- You can see the follower has been added
Messaging followers
Section titled “Messaging followers”There are two ways to write to followers. Message to Followers posts a comment that every follower receives — this is the normal way to keep everyone informed. Choosing a follower by name from the Mail menu sends that one follower a direct email.
An example of this might be, to request a director to respond on a particular request. Only the director will receive the mail, and when they respond the update goes to all followers.
- Open the request
- Open the [Mail] action menu
- Open the Mail menu and pick the follower by name to email only them
- Enter the email subject
- Write the message
- Click Send to email the follower
- Confirm sending the email
- Click Cancel when you do not need a reminder to chase a reply to this mail
Waiting for a reply
Section titled “Waiting for a reply”Whenever you write to someone about a request — a mail to one follower, a mail to a supplier, or a comment to everyone following it — the app asks when you expect to hear back. Enter a date and it raises a Check for response action on the request for that day, assigned to whoever owns the request. The request then reads as Planned until that date and as Overdue once it passes with no reply, so nothing sits forgotten. If you do not want to chase it, cancel and nothing is created.
The follow-up is completed for you as soon as a reply arrives, whether that is an email back into the request or the owner answering in the owner portal.
- Open the request
- Click Add Comment to write to everyone following this request
- Write the message that every follower will see
- Click Send to post the comment to every follower
- Enter the date you expect to have heard back by
- Click OK to raise the follow up
- refresh the page to see the follow up that was raised
- A "Check for response" action is now on the request for that date, so the request reads as planned until then and as overdue if no reply has arrived
Mail history
Section titled “Mail history”Every email sent about a request — to suppliers, to contacts, to followers — is recorded on the Mailings tab, with the sender, the recipient, the subject, the time it was sent and its delivery status. Open any row to see the exact copy the recipient received.
- Open the request
- Open the Mailings tab to see every email sent about this request
- Each row is one email - who sent it, who it went to, the subject, when it was sent and its delivery status
- Click on the subject to open a full copy of the mail
- The full copy of the email, exactly as the recipient received it
Mailing Suppliers
Section titled “Mailing Suppliers”The Mail Supplier action opens a dialog for emailing one or more suppliers about the request — useful for requesting a quote or arranging access. Preview checks the merged content first, and Attach produces the content as a PDF attached to the request without emailing anyone — handy for a paper trail when a supplier is contacted by phone instead. Send Emails sends it for real, and is logged the same way as any other outgoing mail.
Producing work orders for Suppliers
Section titled “Producing work orders for Suppliers”Users can create a reusable communication template which provides the format for a work order. You can then use that to produce a PDF file with work order information that describes an issue. The PDF file is attached to the request.
- Open the request to prepare a letter for the supplier
- Open the [Mail] action menu
- Click Mail Supplier to open the supplier mailing dialog
- Select BBB Maintenance Services Ltd as the supplier
- Click the Template button and choose the Supplier Request template
- Click Attach to generate this as a PDF and attach it to the request, without emailing anything
- Confirm generating and attaching the PDF
- The generated letter is now attached to the request, ready to send or print separately
Mailing requests to suppliers.
Section titled “Mailing requests to suppliers.”Users can send an email to suppliers, with or without a communication template A common pattern is to attach the work order to the request as a PDF, and then send a more personal mail, attaching the format work order with the instructions.
- Open the request to mail the supplier for real
- Open the [Mail] action menu
- Click Mail Supplier to open the supplier mailing dialog
- Select BBB Maintenance Services Ltd as the supplier
- Enter a short message for the supplier
- Click Send Emails to send the mail to the supplier for real
- Confirm sending the mail to the supplier
- Enter the date you expect the supplier to have come back to you by
- Click OK to raise a follow up for that date